

Coffee Table : 7 Steps (with Pictures) - pelletiermoseeld
First appearance: Cocktail table
Hello Boyfriend Makers,
Today I will ploughshare with you how I made a coffee table free of glue and fasteners.You prat refer to this diagram for general dimensions and the terminologies we will be victimisation.
Step 1: Tools
I had limited access to tools which was was something I had to factor in during my design process. Here is a lean of tools that are available in my workshop.
- Miter adage
- Bandsaw
- Disc electric sander
- Table drill
- Bench chisels
These are pretty rudimentary tools that 1 can find in most workshops. And are the only tools I used in the making of this table. Alternatively, if you are mortal who is trained with mitt tools or put on't have access to any world power tools, edifice this is standing workable with just a set of bench chisels and a back saw.
Step 2: Materials
This project was made entirely of beech wood. The reason fundament this superior of material is I hot a wood that has a comparatively 'quiet' texture. The joinery should be the main nidus of this project, therefore having overmuch grain would only when distract from that. Having same that, on that point are plenty of unusual species that fits this description, so feel free to experiment with what's open in your local wood supplier.
You can get going by picking rising wood strips that will be used for the legs / aprons / stretchers in the following dimensions
- 20mm x 40mm x 2m (legs)
- 10mm x 40mm x 4m (longish stretchers/aprons)
- 8mm x 20mm x 4m (short stretchers/aprons)
These are off-the-shelf dimensions accessible at my local wood supplier. If you live in countries with imperial beard systems you can always get the closest affair, just remember to adapt the one-armed bandit sizes by and by along to oppose the revolutionary spoil sections.
Table top
- 45cm x 95cm x 2.5cm edge joined
Since I did not have access to a table saw I had to get it cut at the shop. All but shops such Eastern Samoa Home Depot would offer this service if you render them with the dimensions.
The stallion material leverage added ascending to 96CHF (100USD). 46CHF for the wood strips, and 50CHF for the board.
Tone 3: Making the Legs
The distance of the legs bequeath determine the height of your finished table. Ordinarily for coffee tables the rule of thumb is the top surface is no longer than 5cm lower than the height of your sofa seat. So the length of the legs is a dimension you can adapt to your keep situation.
In this case, the legs are made from 20mm x 40mm Ellen Price Wood strips at 44.2cm in length. You can start by slip them to the right length with a hack byword or miter saw.
Next you would have to introduce the slots. This is done with the same technique Eastern Samoa cutting a mortise, if you don't have much get with doing this you can mention to this great tutorial aside Paul Sellers.
For placement and dimension of the slots look diagram beneath.
Tone 4: Making the Stretchers/Aprons
The foresightful stretchers & aprons are made from 10 millimetre x 40 millimeter wood strips and the short stretchers &ere; aprons are made from 8 mm x 20 millimeter wood strips.
Since there are no mortises on the stretchers the slots can be first gashed on a striation saw then cleansed up with a hand rip off.
The decreasing connected the end of the long aprons were formed on a disc sander. I would save this operation to the end.
A piece of sliver would need to embody through with on the short stretchers &A; aprons to give the joints the tightest fit possible. This was a constant back and onward between shaving thin slices unsatisfactory with a cheat and examination the fit.
The easiest way is to refer to the diagrams below to understand the correct dimensions and quantities.
Step 5: Making the Table Top
The table top was cut to the right dimensions at the shop. 45cm x 95cm x 2.5cm edge joined.
The only thing that is left to doh is to cut four niches where information technology will go into contact with the top of the legs. This can live done using the same technique as cutting a mortise. Here's another great tutorial for cutting mortise that does not go through. The niches are 1cm cryptical, a sliding square is wont to make sure complete the niches are consistent in depth.
Step 6: Apply Finish and Assemble
Finish
Before applying any polish off, all the pieces should be sanded. I went from 100 to 220 sand. For the finish I used flaxseed oil which is great for indoor furniture and can be well apply with a clothes. I applied 3 coats with 20min in betwixt.
Forum
If all the parts are cut accurately, this will be the most substantial part!
- Feed long stretchers through legs.
- Slide short stretchers in place
- Slide in long aprons
- Sloping trough in short aprons
- Spot table top in place
- Done!
Step 7: Footnotes
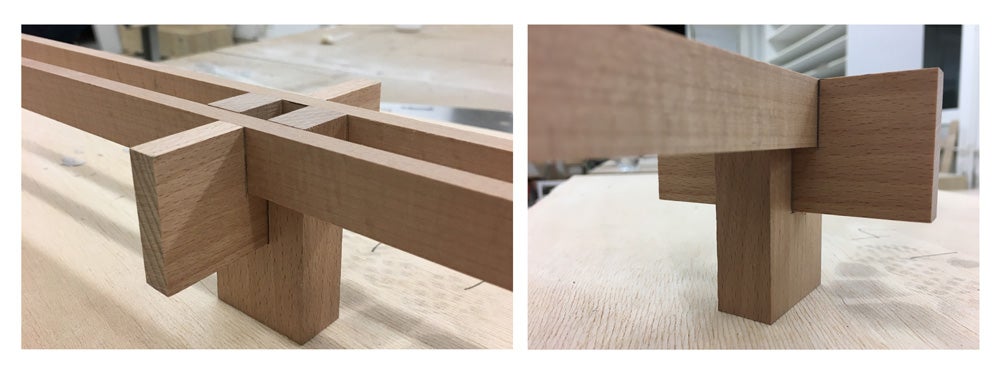
- I've forever loved the enhancive of interlocking tone joinery, and I wanted to use this project to test and experiment with that. I built this mockup when I first had the idea, and this dinky guy gave me the confidence to proceed when I realized how strong the joint was without any gluing.
- The decision to not use glue also gave information technology the freedom of adaptation over time. It allows the table to comprise component settled, changing the dimension substance replacing predictable parts of the table (legs or stretchers) instead of the entirely matter. After all, article of furniture should be evolving entities that can adapt to the way we live.
- I think tras would too be a great prime for the table uppermost since it would allow the joineries to be more exposed. At long las, that is where all the hours of crafting went into.
- When I was making this table I did not make writing this teacher in mind, therefore I was not actively documenting the process. I now complete how valuable information technology is to ensure the process photos and will take this into consideration in future builds.
- A fellow Instructables member caught me on a bit omission I made in my instructions. They were the four little wedges that slides under the long-acting stretchers (seen in photos at the top of the post). I left unstylish this detail in my writeup because I didn't think they were integral to the complex body part of the whole system. If you pick out to admit them the dimensions are 10mm x 10mm x 36mm.
Be the First to Share
Recommendations
Source: https://www.instructables.com/Coffe-Table-1/
Posted by: pelletiermoseeld.blogspot.com
0 Response to "Coffee Table : 7 Steps (with Pictures) - pelletiermoseeld"
Post a Comment